OTA Update
SocketXP OTA update tool is extremely useful when you have to deploy software update on a fleet of Linux devices.
The OTA update tool can be used to update the following artifacts:
- Firmware
- Software packages
- Application binaries
- Docker containers
- Program files
- Config files
- Execute a script or command
on multiple remote devices.
You can use the OTA update APIs to automate your DevOps workflow.
Creating and Deploying OTA Update
Creating and deploying OTA update using the tool is a two step process:
- Create and upload an Artifact to the SocketXP Artifact Registry
- Create an OTA Update Deployment using the artifact
The basic concept behind this two step approach is to reuse the uploaded artifact across multiple deployments.
OTA Update Best Practices
For a successful OTA update deployment, have a small fleet of devices in your development lab as a Test Group. These devices should be similar to the ones in the Production Group.
First, deploy your OTA update to the Test Group. Verify that the update is successful and everthing is working as expected. Look at the OTA update deployment logs for each of the devices in the Test Group.
Fine tune your OTA update workflow or fix bugs in your app, until the OTA update to the Test Group is successful.
Only then deploy your OTA update to devices in your Production Group.
Large organizations with sophisticated development teams have Development, Testing, Stating and Production Groups. They even create a small subgroup under the Production Group, named as Canary Group, to rollout their OTA update to the Canary Group first (following the Canary Deployment Model) before deploying the OTA update to all other devices in the Production Group.
Step #1: Create and Upload Artifact
An artifact can be any software compontent that needs to be installed or updated on a device. For example, artifacts can be any of the following:
- Firmware
- Software packages (.deb, .rpm)
- Application binaries(*.bin)
- Docker/Linux containers
- Program files (.py, .pl, .go, .*)
- Config files (json, xml, yaml, ini)
- Script files (.sh, .py, *.pl)
You can bundle any of these artifacts into a tar.gz file, along with an OTA Update Workflow Script, and upload it to the SocketXP Artifact Registry.
An OTA Update Workflow Script defines the core logic behind an OTA update. The workflow script will contain a list of instructions on how to update the software package in the device and the order in which these instructions need to be executed. The workflow script will also contain a rollback-on-failure logic to rollback the device software to the original state, if the update fails.
Learn more about how to create the workflow script file named update.sh in the below link:
SocketXP Artifact Registry is a cloud based storage that can be used to store your artifacts. Today, it can store only two forms of artifacts:
- tar.gz file
- script file (Linux shell or Python based workflow script)
This means, you should bundle all your artifacts(such as, your firmware or app binary, config files etc) into a single tar.gz file and upload it to the SocketXP Artifact Registry. The tar.gz bundle must also contain the OTA update workflow script, named update.sh, that tells SocketXP how to install and update your artifacts on the remote devices.
If your firmware, app or Docker container image is stored in a cloud-based third-party registry such as GitHub Registry or Docker Hub Registry, you can skip creating the tar.gzfile. You can directly upload the OTA Update Workflow Script (update.sh) file to the SocketXP Artifact Registry as a script type artifact. You can then deploy an OTA update to select group of devices using the workflow script.
Step #1.1: Create an artifact to upload
In this section, you'll learn how to create a tar.gz type artifact.
First create a new folder for your artifact. For this example, let's name the folder as ota_update_version_1.2.3. Next, copy the new version (1.2.3) of your firmware or application binary or software package, along with the workflow script file update.sh, into the folder. Finally, archive and compress the contents of the folder into a tar.gz file as shown in the example below:
$ mkdir ota_update_version_1.2.3
$ cp /home/user/myapp ota_update_version_1.2.3/.
$ cp /home/user/update.sh ota_update_version_1.2.3/.
$ tar -czvf ota_update_version_1.2.3.tar.gz ota_update_version_1.2.3
$ ls
ota_update_version_1.2.3.tar.gz     ota_update_version_1.2.3
Warning:
The size of the tar.gz archive file must NOT exceed the 10MB limit. SocketXP Artifact Registry will not allow uploading a file that is more than 10MB in size.
How the OTA update is processed in the device:
SocketXP agent running in your IoT device, upon receiving the OTA update, will start downloading the tar.gz artifact file into the /tmp folder in the device. The agent will then unzip and untar the tar.gz file contents into the /tmp directory of your device. It will then change the current working directory to the artifact directory (For eg: cd ota_update_version_1.2.3/) and start executing the update.sh script file in the directory (Eg: sh ./update.sh).
For the change directory command(cd) to work correctly, ensure that the artifact folder name and the tar.gz file name matches, when creating the tar.gz file.
Also, the workflow script file must be named as update.sh
Example Build Scripts in GitHub Repository
We have created a GitHub repository that has example build scripts to build and package the following types of artifacts:
- App binary
- Debian Package
- Config files
- Script Files
- Container Images
You can clone the GitHub repository and leverage the example build scripts in it to build and package your application as a tar.gz type artifact.
Step #1.2: Upload the artifact
Now that you have created the artifact tar.gz bundle file, upload it to the SocketXP Artifact Registry.
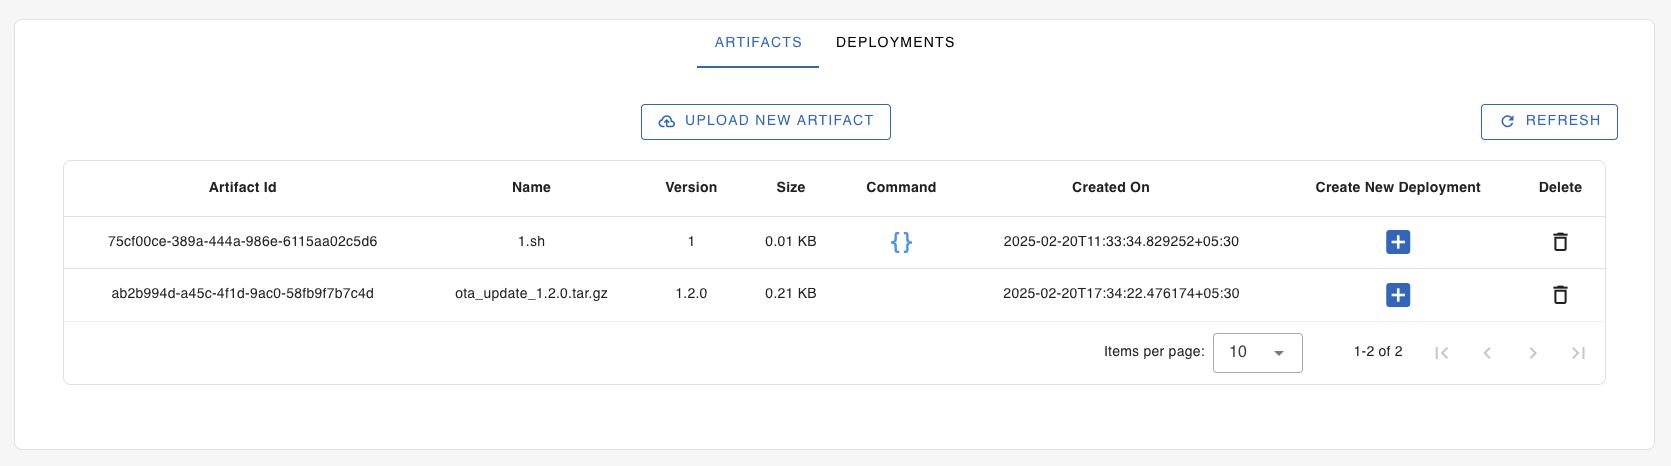
Login to the SocketXP Web Portal. Go to the "OTA Update" page. Click the "Upload New Artifact" button.
A new window will popup.
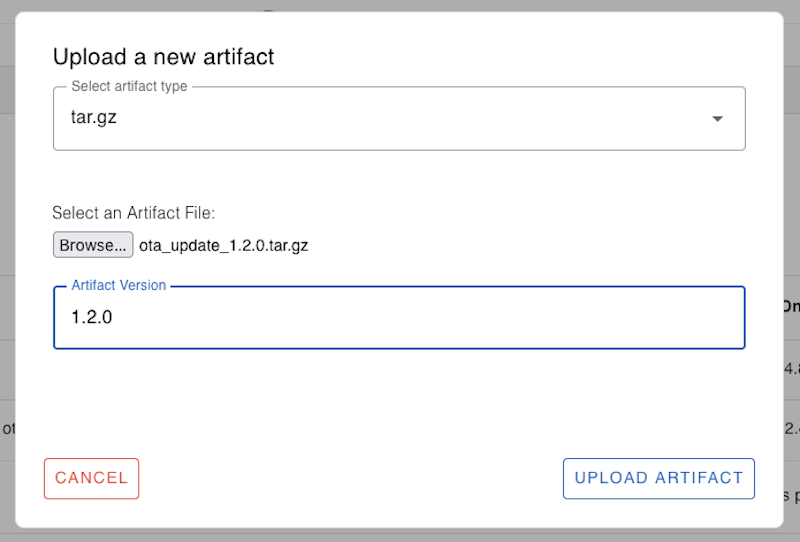
Select the artifact type as tar.gz, which is the default option provided.
Browse and select the ota_update_version_1.2.3.tar.gz artifact file you have created in the previous section. The file size MUST NOT exceed the 10MB limit (the maximum file size allowed by the SocketXP Artifact Registry).
Enter the version of the artifact, for example: "1.2.3" or "2.5.7", in the text field provided.
Finally, click the "Upload" button to upload the artifact into the SocketXP cloud artifact registry.
A pop window will show that the "File uploaded succeessfully". It will display an error message, if the upload failed for any reason.
Step #2: Create an OTA Update Deployment
Now that you have created and uploaded a new artifact to the cloud registry, you can create an OTA Update Deployment to deploy the artifact to a select group of devices in your account.
OTA Update Deployment is the actual deployment(the trigger) of the OTA Update on a select group of devices. This step is very simple. You select an artifact from the SocketXP Artifact Registry and specify the device ID or device group or the tag on which you want to deploy/update the artifact.
How to create an OTA Update Deployment
From the OTA update page, select the ARTIFACTS tab and click the '+' icon (shown below) next to any artifact listed there. This will popup a Create a new deployment window.
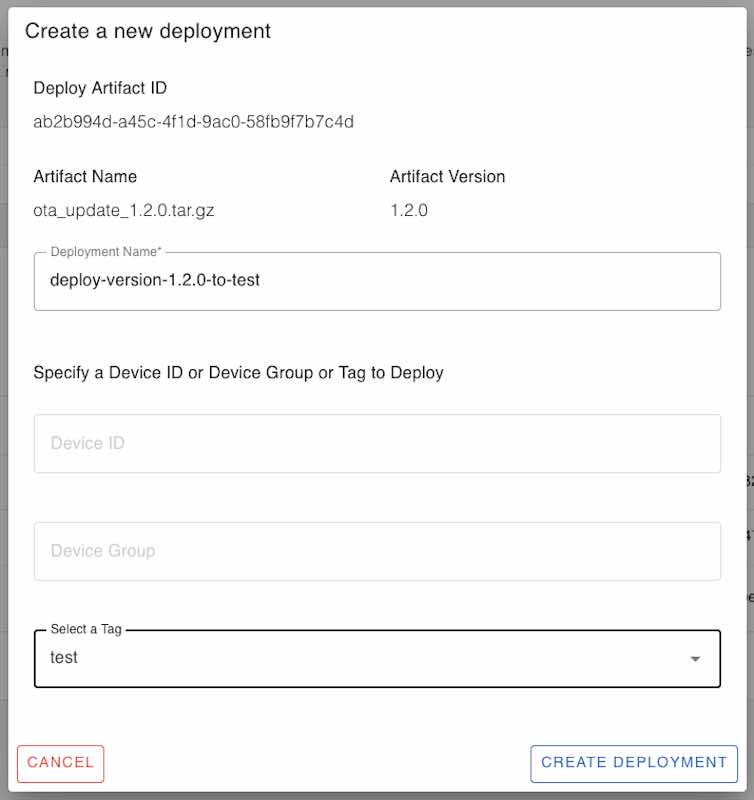
Create a new deployment as described below:
Artifact ID- This pre-filled data shows the workflow ID used for the deployment to be created.Artifact Name- This pre-filled data shows the workflow name used for the deployment to be created.Deployment Name- Specify a name to remember this deployment for your reference. Eg: "deploy-myapp-1.2.3-to-test-group"Device ID, GrouporTag- Specify a single Device ID or a Device Group or a Device Tag ( Eg: testing, production, customer-xyz, temp-sensor etc.) on which to deploy the OTA update.- Finally, click the
CREATE DEPLOYMENTbutton to save and finish.
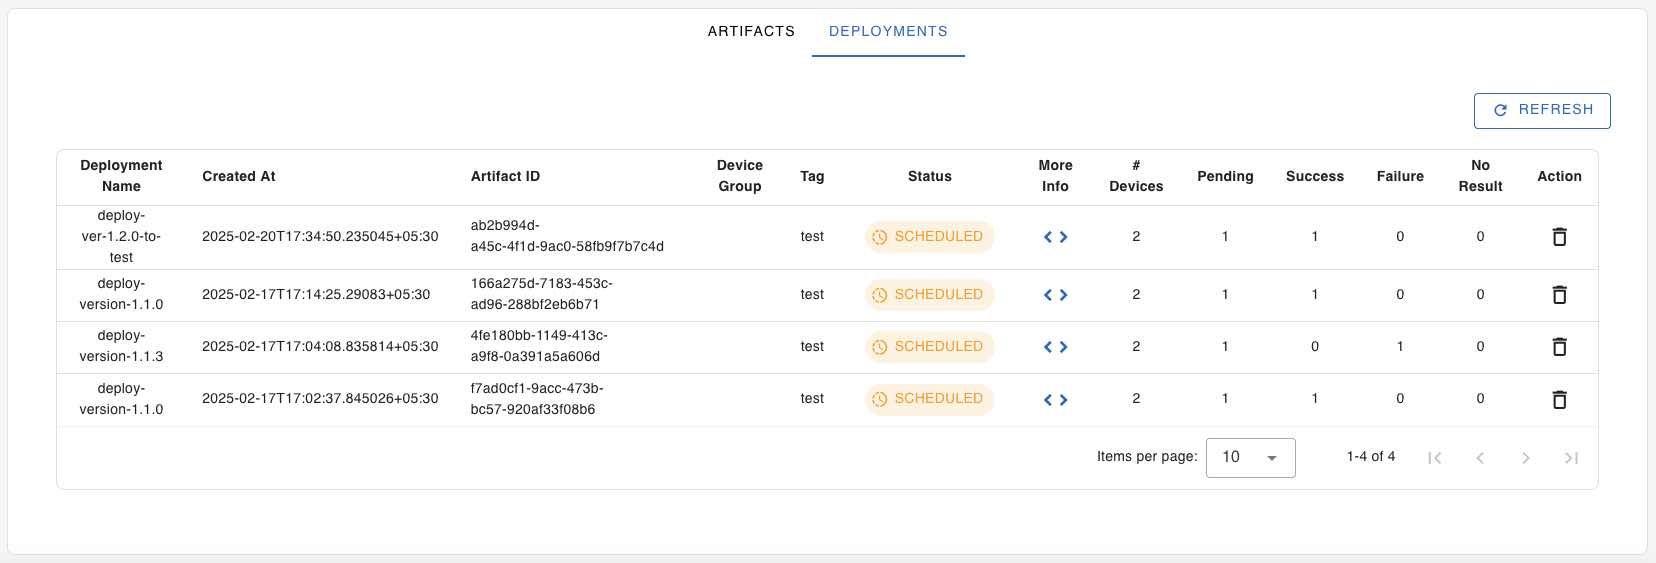
Go to the DEPLOYMENTS tab and hit the Refresh button to view your newly created deployment.
Note
You can create as many number of OTA Update Deployments from a single artifact file. Each deployment can be for a different device ID, group or tag such as development, testing, production etc. This way the uploaded artifact or the workflow script can be reused across deployments.
You can monitor the progress of the OTA Update Deployment by clicking the Refresh button.
You can monitor the progress of the deployment on individual devices in the Device Group or Device Tag, by simply clicking the "More Info < >" button in the deployment row. A Deployment Progress window will popup. The window will have a table containing the deployment progress for each of the devices in the group or tag on which the deployment was scheduled. Hit the Refresh button above the table to view the progress in realtime.
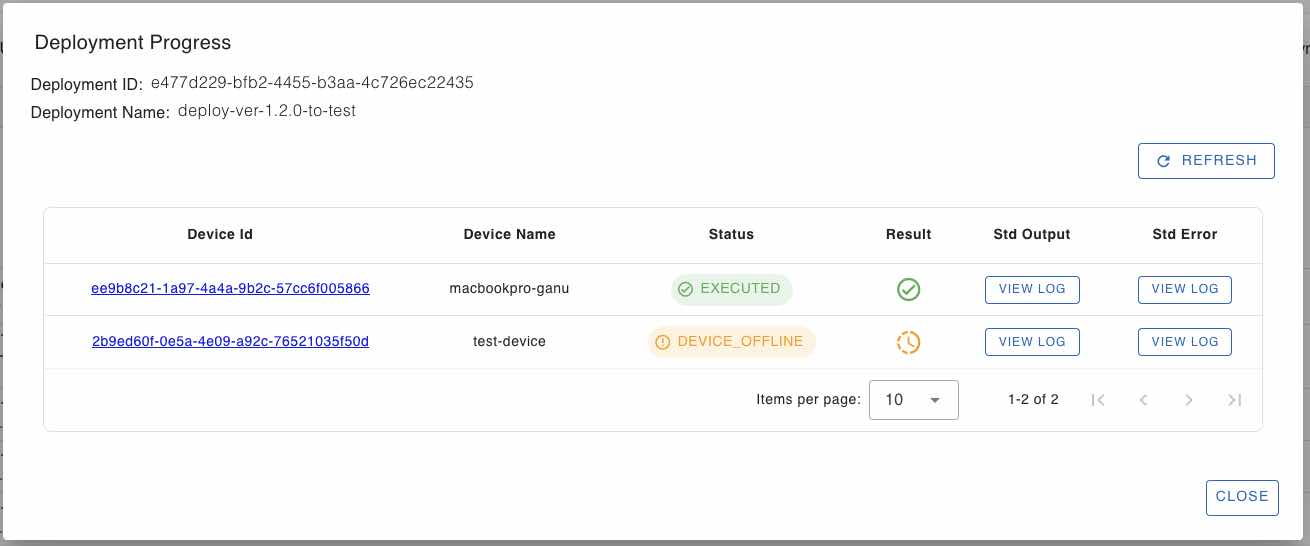
You can also view the logs (workflow script execution logs and error logs) for each device by clicking the VIEW LOG button next to the device. If your job shows as failed or error, then check the stderr logs.
Note:
SocketXP will not retry an OTA update deployment if the deployment fails on a device. You'll have to manually create a new deployment from the artifact, and request it to be deployed on those devices where the current deployment failed.
If an IoT device was offline or down when the deployment was deployed, SocketXP will download the deployment to the device when the device boots up or becomes online. SocketXP will download deployents to the device in the order in which they were deployed. There will be a brief pause(roughly, 5 minutes) between updates, if there are more than one OTA update pending for the device.