Authentication Token
SocketXP IoT Platform enforces Zero Trust Security. You need an authentication(auth) token to add a device or access a device.
Sign up at https://www.socketxp.com/login and get your authentication token.
SocketXP provides two types of auth tokens
- Basic security auth token
- Advanced security auth token
Basic Security Auth Token
Basic security auth token is a multi-purpose auth token.
Basic security auth token is useful for getting started and quickly trying SocketXP solution for learning and testing purposes. Basic security auth token is not recommended for production purposes.
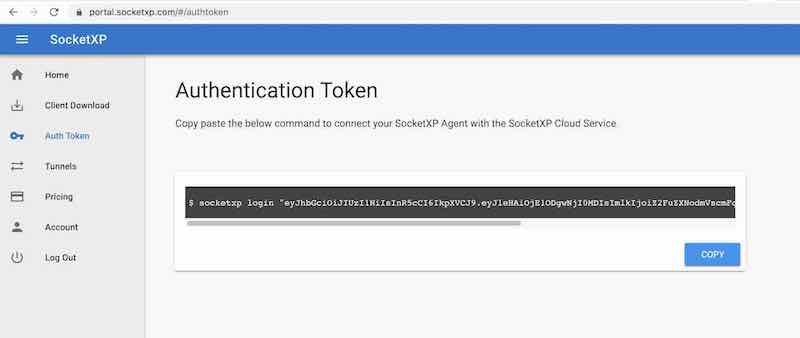
Use the authentication token to authenticate the SocketXP agent with the SocketXP Cloud Service, as shown below.
If you prefer to name your device using a unique identifier, you could use additional arguments to the login command as shown below.$ socketxp login <your-auth-token-goes-here> --iot-device-name "sensor12345" --iot-device-group "temp-sensor"
Note
You cannot change the device name and device group from the CLI, after you have registered the device once using the login command. If you want to update the device name or group later, you can do so only from the SocketXP Web Portal's Devices section by editing the device listed in the table.
The login command will download a unique device.key from the SocketXP Cloud Gateway and store it in the /var/lib/socketxp folder. The authtoken is used to authenticate with the gateway, add the device to your account, and download a unique device key generated by the gateway for the device. The authtoken will not be stored in the device. The device key will be used for all future authentication purposes.
Advanced Security Authentication Tokens
Advanced security authentication(auth) tokens are single-purpose auth tokens.
It means each token can be created and used for a specific purpose only.
Moreover, each auth token has a built-in expiry time, which is a user configurable value. The token cannot be used for the intended purpose after it expires.
Security Tip
It is highly recommended that you create short-lived authentication tokens. So that, even if a token is stolen or misplaced, it will expire in few hours or in a day's time. We DO NOT recommend creating perpetual auth tokens.
Auth tokens for specific purposes
-
API Access Token - Can be used only for accessing SocketXP Developer APIs. Set the token as HTTP Authorization Header Bearer Token.
-
Device Registration Token - Can be used only for device registration purposes.
-
Device Access Token - Can be used only for remotely accessing/connecting to the device in IoT Slave Mode.
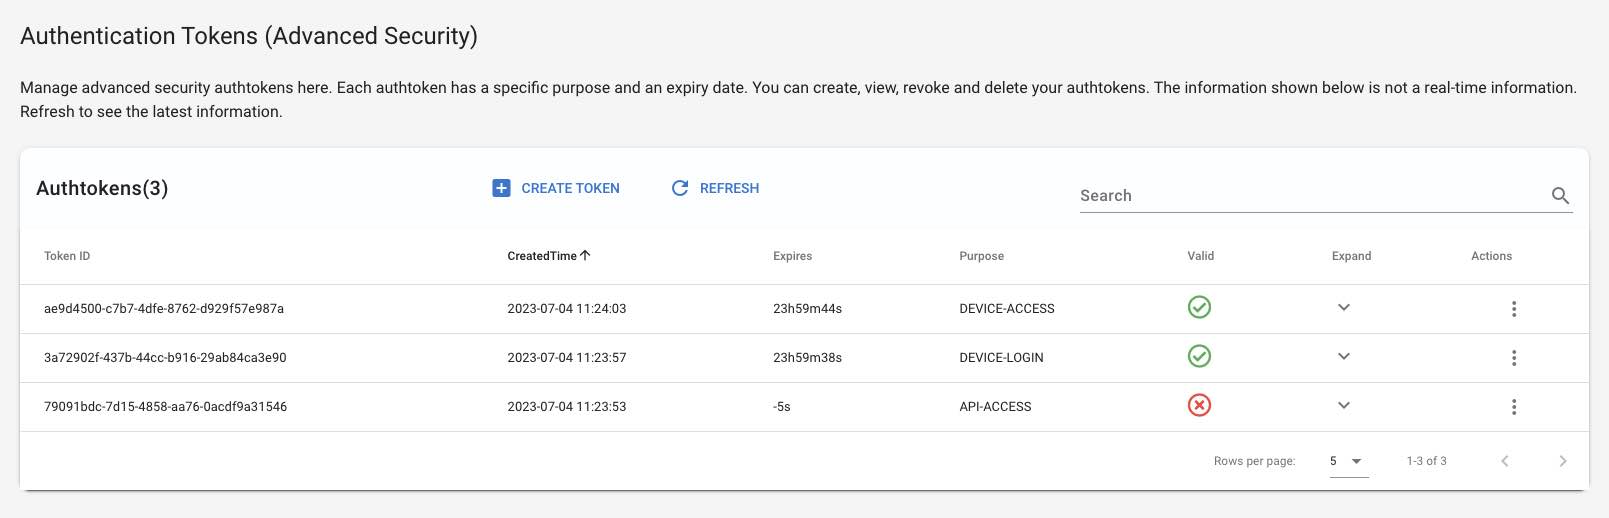
You need to click the expand icon to expand each entry in the table shown above to view and copy the auth token.
Use the device registration authentication token to register the SocketXP agent installed in your device with the SocketXP Cloud Service, as shown below.
$ socketxp login "eyJhbGciOiJIUzI1NiIsInR5cCI6IkpXVCJ9.eyJleHAiOjE1NDk1MTg0MDAsImlkIjoiZ2FuZXNodmVscmF..."
$ socketxp login <your-auth-token-goes-here> --iot-device-name "sensor12345" --iot-device-group "temp-sensor"
Now you can access the IoT device from the SocketXP Web Portal's Devices Page by clicking the terminal icon next to the device.
But, if you want to connect to this IoT device using PuTTY, FileZilla or any SSH client, you need to install and run the SocketXP agent in IoT Slave Mode in your access device such as your Laptop.
You also need to create and use a DEVICE-ACCESS token from the web portal.