Single-Touch Installation Command
The 3 step instruction explained in the Getting Started section to setup SocketXP agent on your IoT device is a tedious process, if you have thousands of devices to install, configure and manage.
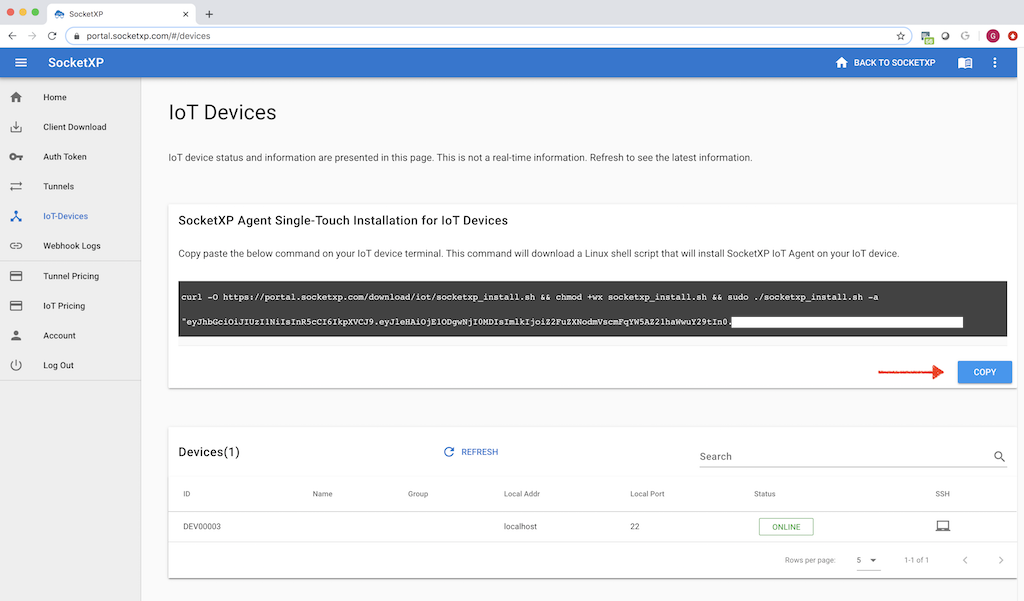
With this in mind, SocketXP also provides a one-line command or single-touch installation command for installing and configuring SocketXP IoT Agent. This is extremely useful when you need to install SocketXP agent on a large number IoT or RPi devices.
Copy paste the below single-touch installation command from the SocketXP portal page into the terminal of your IoT devices and it will install, configure, setup and bring up the devices online in our SocketXP portal.
Gateway Region
EU region users, please kindly copy this command from your EU gateway web portal page. It will have the -r "eu" flag set additionally in the command. This is important if you want to register your device with the EU gateway. The default gateway region is US.
Platform Architecture Type
The above single-touch installation command automatically reads your CPU platform architecture and OS type information from the uname -m command output.
If your device is Arduino, MiniPC, NVIDIA Jetson, UDOO, Asus Tinker Board, Banana Pi, Orange Pi, Nano Pi or other Pi variations, feel free to edit the socketxp_install.sh script to meet your device or platform archtecture requirements.
In addition to installing and configuring SocketXP IoT Agent on your Raspberry Pi device, the single touch installation command would also make the SocketXP IoT Agent to run as a Linux Systemd deamon in the background. So that whenever your device gets rebooted, SocketXP IoT Agent will be kickstarted automatically on boot up.
Sample Configurations for various usecases:
The socketxp_install.sh installation script takes the following arguments:
$ ./socketxp_install.sh
Usage:
./socketxp_install.sh -a <auth-token> [ -r <region> ] [ -n <device-name> ] [ -g <device-group> ] [ -p <platform> ] [ -l <local-destination> ] [ -s <subdomain-prefix> ]

Note:
Command argument auth-token is mandatory.  All other arguments are optional.
Acceptable platform values: [ amd64, arm, arm64 ]
Acceptable region values: [ eu, us-central ].  Default region: us-central
IoT Remote SSH Configuration
An example use of the script for remote SSH configuration would like this:
$./socketxp_install.sh -a "eyJhbGciOiJIUzI1NiIsInR5cCI6IkpXVCJ9..." -p "arm" -l "tcp://127.0.0.1:22" -n "my-device-name"
IoT Remote Web Service Access Configuration
For example, to set up remote access for the web service running inside your IoT device, use the below sample command:
$./socketxp_install.sh -a "eyJhbGciOiJIUzI1NiIsInR5cCI6IkpXVCJ9..." -p "arm" -l "http://localhost:80" -s "device-ABC123456789"
-s <subdomain prefix> argument in the above command, which is a mandatory argument for web service usecase. The IoT Device ID is used as the subdomain prefix to easily map the device to the SocketXP Public URL used to access the device.
In this case, the public URL generated by SocketXP IoT Cloud Gateway would look like this:
How to setup both SSH and webservice HTTP remote access:
The single-touch installation script creates a config file at: /etc/socketxp/config.json
It would look something like this:
$ cat /etc/socketxp/config.json

{
"region": "",
"tunnels" : [
  {
      "destination": "tcp://127.0.0.1:22"
  }
]
}
tunnels section in the above config file to include the HTTP webservice as well. The config.json file would look like this:
$ cat /etc/socketxp/config.json

{
"region": "",
"tunnels" : [
  {
      "destination": "tcp://127.0.0.1:22"
  },
  {
      "destination": "http://127.0.0.1:8080",
      "subdomain": "device-abc123456789",
  }
]
}
destination URL, destination HTTP port and the subdomain name in the above config.json file to the one that suits for your webservice.
If you have few more HTTP services running in your device, and you would like to generate public web URL for each of those services too, then repeat the same steps explained above. Add a new service configuration in the tunnels section in the config.json file.
And finally don't forget to restart the socketxp systemd service for the new configuration to take effect.