Remote Access MySQL Database Behind Firewall
In this section, we’ll discuss how to securely connect to a remote MySQL database running in a private network (behind NAT router and firewall) over the internet.
You can use the same procedure to remote access any database over the internet. The database could be running in a server or Raspberry Pi or any embedded device.
Prerequisites:
You'll need the following artifacts for this tutorial
- MySQL server
- MySQL client
- SocketXP agent
Overview:
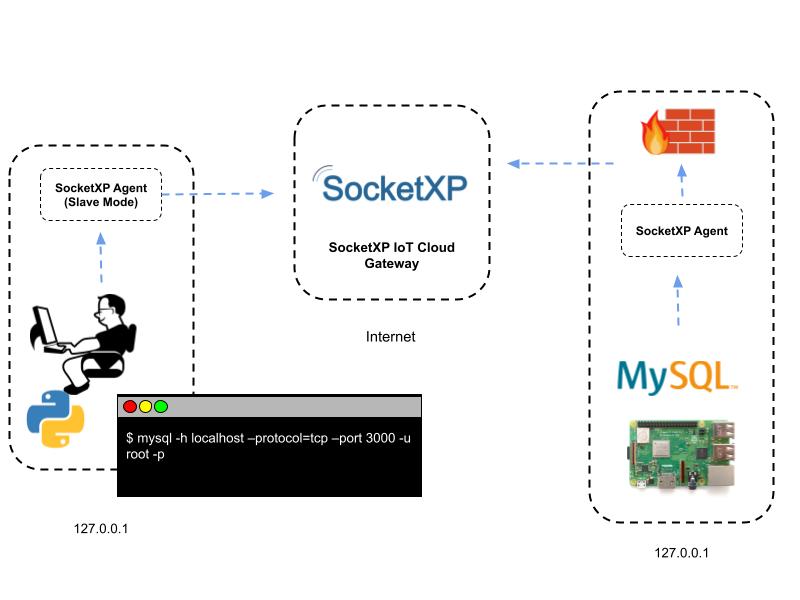
Our overall aim is to securely connect to a MySQL database server in a office network (behind firewall) from an outside network such as the coffee shop or your home using the MySQL client utility or a Python based MySQL client program running in your laptop.
Here is an overview of what we are about to configure and setup to achieve remote access to a MySQL database:
MySQL Database Server Setup:
Let’s assume you already have a MySQL database installed and running in a remote server in a private network behind NAT router and firewall (say, your home or office network).
If not, visit the MySQL official website and follow the instructions to download, install and setup a MySQL database in your remote server.
For this tutorial, we’ll be using a docker container version of MySQL database server from the Docker Hub MySQL Official Repository.
$ docker run --name mysql -e MYSQL_ROOT_PASSWORD=test123 -p 3306:3306 -d mysql:8.0
295305d8f3f17445f5890d5af5a82dda2c4298cbdf1c26717d70a62936e00237
$ docker ps
CONTAINER ID   IMAGE       COMMAND                  CREATED       STATUS       PORTS                               NAMES
295305d8f3f1   mysql:8.0   "docker-entrypoint.s…"   3 seconds ago   Up 3 seconds   0.0.0.0:3306->3306/tcp, 33060/tcp   mysql
Now let’s try connecting to this database using a local mysql client on the server(host).
$ mysql -h localhost --protocol=tcp  -uroot  -v -p
Enter password:
Welcome to the MySQL monitor.  Commands end with ; or \g.
Your MySQL connection id is 25
Server version: 8.0.33 MySQL Community Server - GPL

Copyright (c) 2000, 2023, Oracle and/or its affiliates.

Oracle is a registered trademark of Oracle Corporation and/or its
affiliates. Other names may be trademarks of their respective
owners.

mysql>
Let’s create a new database named school_db.
mysql> connect school_db;
Reading table information for completion of table and column names
You can turn off this feature to get a quicker startup with -A

Connection id:    28
Current database: school_db
Create a table named student in the school_db database with the following columns: (Name, Age, Class).
Insert few students' data into the table as shown below.
mysql> insert into student (name, age, class) values ('james', 10, '5th grade')
mysql> insert into student (name, age, class) values ('thomas', 9, '4th grade');
mysql> insert into student (name, age, class) values ('percy', 11, '6th grade');
mysql> select * from student;
+--------+------+-----------+
| name   | age  | class     |
+--------+------+-----------+
| james  |   10 | 5th grade |
| thomas |    9 | 4th grade |
| percy  |   11 | 6th grade |
+--------+------+-----------+
3 rows in set (0.00 sec)
Now to access this remote MySQL database server securely from an outside network such as your home or coffee shop, we need to install the SocketXP Remote Access agent on this server.
SocketXP Agent Setup on the MySQL Database Server
Follow the steps below to download and install SocketXP agent on your remote database server.
Step #1: Download and Install
Follow the download and install instructions to install the appropriate SocketXP agent on your server. SocketXP agent can work on any OS (Windows, Linux, and MacOS) and any hardware platforms (x86_64, Intel, AMD, ARM, RISC, Apple M1/M2)
Step #2: Get your Authentication Token
Visit SocketXP Web Portal and sign up for free to get your authentication token. No credit card required.
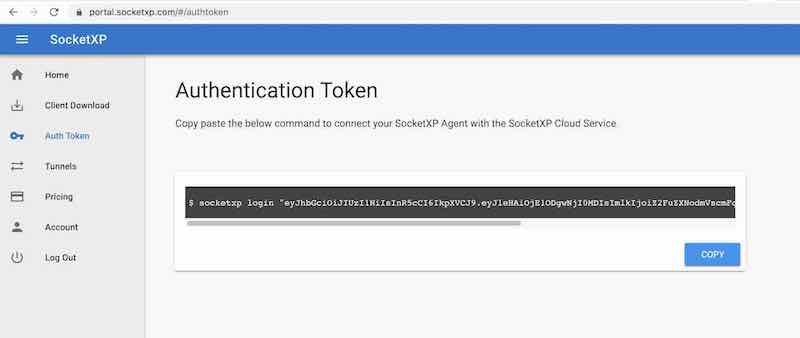
Use the following command to register the SocketXP agent installed on your server with the SocketXP Cloud Gateway:
Step #3: Create a secure SSL/TLS tunnel
Next, use the below command to create a secure SSL/TLS tunnel between the MySQL DB service running in your server at TCP port 3306 to the SocketXP Gateway using the SocketXP agent.
$ sudo socketxp connect tcp://127.0.0.1:3306

Connected to SocketXP Cloud Gateway.
Access the TCP service securely using the SocketXP agent in IoT Slave Mode.
Step #4: Connect to the remote MySQL DB from a local machine
Follow the instructions in step #1 to download and install the SocketXP agent on your laptop or any local device from which you want to connect to your remote MySQL database server.
Use the below command to run the SocketXP agent in IoT Slave Mode(Local Proxy Mode) on your laptop:
$ sudo socketxp connect tcp://localhost:3000 --iot-slave --peer-device-id 4853b37f-616d-4662-91bb-b394ce84fc1b --peer-device-port 3306 --authtoken eyJhbGciOiJIUzI1NiIs…

Listening for TCP connections at:
Local URL -> tcp://localhost:3000
Where port 3000 is the local proxy port at which the SocketXP agent is listening for connections from any MySQL client. You could specify any free port in your laptop as a local proxy port instead of 3000 (say for example, port 3306).
You could find the device ID of your device from the SocketXP Web Portal page in the Devices section. Alternatively, you could use the --peer-device-name option instead of --peer-device-id and input the device name (for eg: "MySQL DB", in this example.) to connect.
Why this is important?
SocketXP IoT Agent when run in IoT Slave Mode acts like a local proxy server. It proxies all connections to a user-specified local port (3000 in the example above) in your laptop/PC to the SocketXP IoT Cloud Gateway using a secure SSL/TLS tunnel. Also the SocketXP IoT Agent authenticates itself with the SocketXP IoT Cloud Gateway using your auth token. This ensures that only legitimate, authenticated users are permitted to access your remote IoT devices. SocketXP ensures Zero-Trust security on all connected devices.
Next, you need to install the MySQL client on your laptop or local machine, so that you can connect to your remote MySQL database via the SocketXP secure tunnel.
Note
Potentially, you can have a Python program running in this local machine to connect to your remote MySQL database. But for keeping this tutorial simple, we'll be using the MySQL client example first. Later, we will use a Python based MySQL client program to explain the same concept.
Now open a new terminal window in your laptop.
Using the MySQL client, you can connect to your remote MySQL database server as shown below:
$ mysql -h localhost --protocol=tcp --port 3000 -uroot  -p
Enter password:
Welcome to the MySQL monitor.  Commands end with ; or \g.
Your MySQL connection id is 29
Server version: 8.0.33 MySQL Community Server - GPL

Copyright (c) 2000, 2023, Oracle and/or its affiliates.

Oracle is a registered trademark of Oracle Corporation and/or its
affiliates. Other names may be trademarks of their respective
owners.

Type 'help;' or '\h' for help. Type '\c' to clear the current input statement.

mysql>
In parallel, you'll see the below message on the other terminal window where you are running the SocketXP agent in IoT Slave Mode:
$ sudo socketxp connect tcp://localhost:3000 --iot-slave --peer-device-id 4853b37f-616d-4662-91bb-b394ce84fc1b --peer-device-port 3306 --authtoken eyJhbGciOiJIUzI1NiIs...

Listening for TCP connections at:
Local URL -> tcp://localhost:3000
<b>Dialing SocketXP IoT Gateway for device (4853b37f-616d-4662-91bb-b394ce84fc1b, ) port (3306) remote access...</b>
Now, switch back to the terminal window where you are running the MySQL client and execute a test query, as shown below.
mysql> connect school_db;
Reading table information for completion of table and column names
You can turn off this feature to get a quicker startup with -A

Connection id:    30
Current database: school_db
mysql> select * from student;
+--------+------+-----------+
| name   | age  | class     |
+--------+------+-----------+
| james  |   10 | 5th grade |
| thomas |    9 | 4th grade |
| percy  |   11 | 6th grade |
+--------+------+-----------+
3 rows in set (0.61 sec)

mysql>
We are able to successfully connect to our remote MySQL database and execute a query remotely.
Simple MySQL Client using Python
Now, let's use a simple MySQL client program written in Python to demonstrate the database remote access usecase.
Here is a simple MySQL client written in Python using the mysql.connector package.
You need to install the mysql.connector package using the following command:
# mysql_client.py
import mysql.connector

# Create a connection to the MySQL DB
myconn = mysql.connector.connect(host = "localhost", port = 3000,
                user = "root", passwd = "pa$$word123", database = "school_db",
                auth_plugin='mysql_native_password')
cur = myconn.cursor()
cur.execute("select * from student")
result = cur.fetchall()

# Print the student table.
for x in result:
    print(x);

myconn.close()
Now, let's execute the python program to fetch the student details:
We are able to successfully connect to our remote MySQL database and execute a query remotely.