IoT Web Service Remote Access
SocketXP IoT Cloud Gateway provides secure HTTPS tunnels to pull or push data from your remote IoT web server. SocketXP also provides a globally unique public URL for the web services running in your IoT devices, so that you could access your IoT Remote Web Service from the internet via any portable mobile device.
Typical IoT Web Service Remote Access usecases
- Remote access to HTTP server serving files and data stored in your IoT device
- Remote access to web applications running in your IoT device
- Remote access to Home Assistant(Hassio) server running in your RPi device or home server
- Remote access to REST APIs provided by your IoT device application
- Remote access to VOIP devices or WiFi access points in your local network via a Raspberry Pi
- Remote access to bot running in your private network.
- Forward webhook notifications from online services to bot running in your private network.
- Remote access to a web server running in your IoT device that hosts and serves live photos and live video recordings from your security camera or dogcam.
- Remote access to a web application running in your drones.
- Remote access to a MQTT broker in your home or office network over HTTP or Web Socket. IoT devices in the field would use the SocketXP HTTP tunnel to stream sensor data using MQTT to the remote MQTT broker.
Got more usecases?
Write to us, if have any questions about any of the usecases above: [email protected].
Public URL for your web app - NodeJS Example
For our discussion, let's take the case of IoT remote web application access as an example.
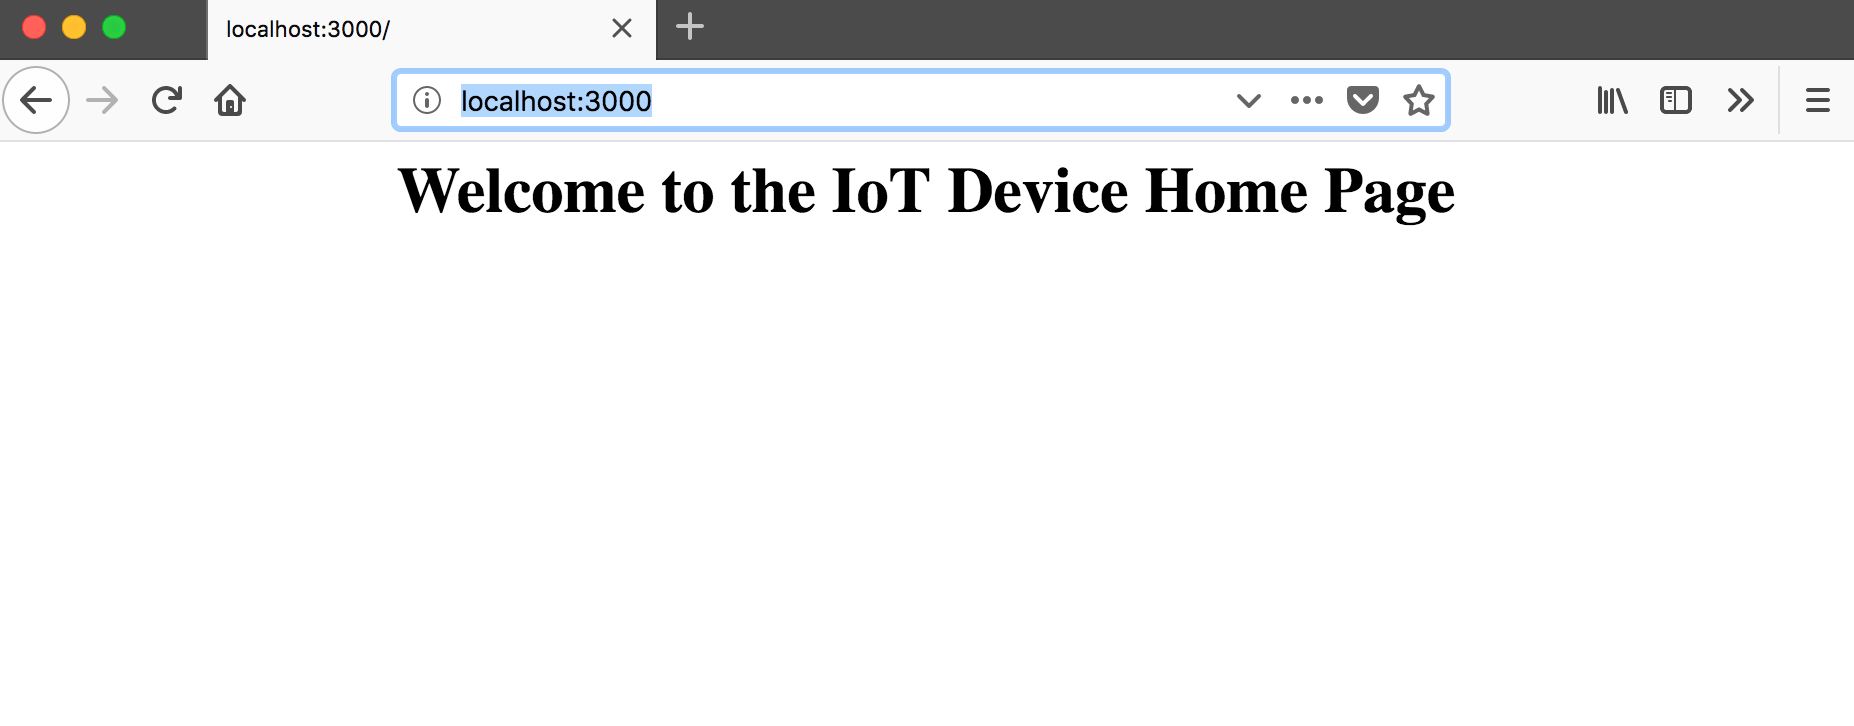
Let's assume you have a nodejs web application(as shown below), running in your IoT device. Let's also assume that the nodejs app listens on localhost port 3000.
$ cat myapp.js
var http = require('http');

//create a server object:
http.createServer(function (req, res) {
 res.writeHead(200, {'Content-Type': 'text/html'});
 res.write('<h1 style="text-align:center;">Welcome to the IoT Device Home Page</h1>'); //write a response to the client
 res.end(); //end the response
}).listen(3000); //the server object listens on port 3000
Now to access your nodejs web application from the internet, SocketXP provides two options:
- Create a Public Web URL using SocketXP and expose the web app to the public internet.
- Keep your web service or app private. Securely remote access your private web app by running SocketXP agent in Slave Mode in any access device.
Option #1: Create a SocketXP Public Web URL
Follow the instructions below to create a SocketXP HTTPS tunnel and a Public Web URL for your web app.
Step #1: Install SocketXP IoT Agent
Download and install the SocketXP IoT agent on your IoT or Raspberry Pi device.
Step #2: Get your Authentication Token
Sign up at SocketXP Web Portal and get your authentication token.
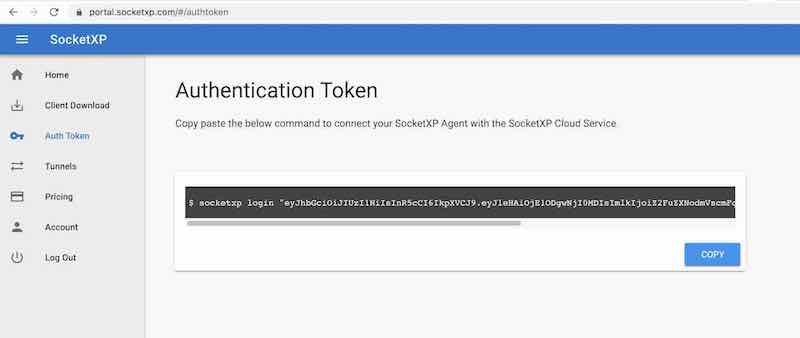
Use the following command to login to the SocketXP IoT Cloud Gateway using the auth token.
$ socketxp login <your-auth-token-goes-here> --iot-device-name "sensor12345" --iot-device-group "temp-sensor"
Step #3: Create a HTTPS tunnel to your IoT Node.js app
Use the following command to create a secure and private HTTPS tunnel endpoint at the SocketXP IoT Cloud Gateway.
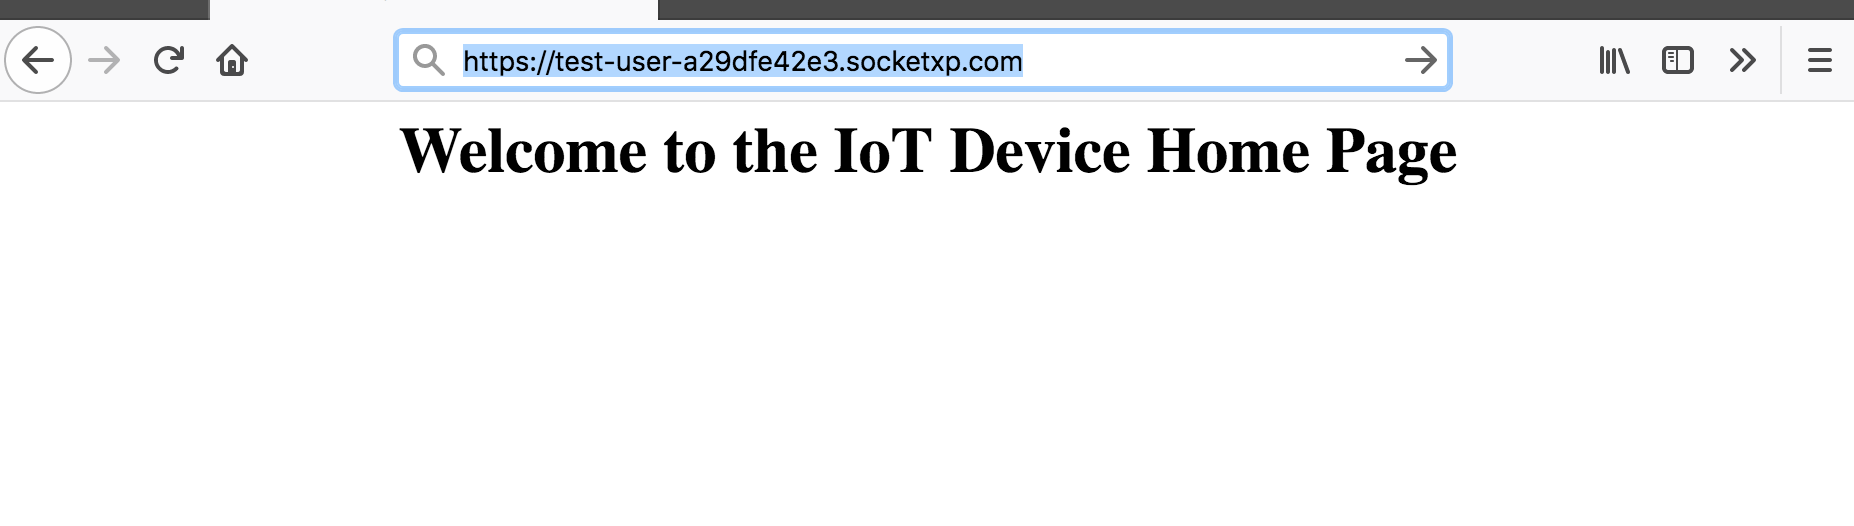
$ socketxp connect http://localhost:3000

Connected.
Public URL -> `https://test-user-a29dfe42e3.socketxp.com`
Step #4: Access the SocketXP public web URL
Now access your IoT nodejs app from the internet using the SocketXP Public URL (https://test-user-a29dfe42e3.socketxp.com) displayed in the previous step.
Single-Touch Installation
The 3 step instruction explained above to install & configure SocketXP IoT Agent on your IoT device is a tedious process, if you got thousands of RPi to install, configure and manage.
To simplify the setup process, SocketXP IoT Remote Access Solution also provides a single-touch installation command for installing and configuring SocketXP IoT Agent on large number of IoT or RPi devices.
Copy paste the below single-touch installation command into the terminal of your IoT devices and it will install/configure/setup and bring up the devices online in our SocketXP portal. Don't forget to update the auth-token in the below command with the one uniquely assigned to you.
$ curl -O https://portal.socketxp.com/download/iot/socketxp_install.sh && chmod +wx socketxp_install.sh && sudo ./socketxp_install.sh -a <your-auth-token-goes-here> -p "arm" -l "http://localhost:3000" -s "techron-abc123456789"
-s <subdomain prefix> argument in the above command, which is a mandatory argument for creating SocketXP HTTPS tunnels.
In this case, the public URL generated by SocketXP IoT Cloud Gateway would look like this:
where abc123456789 is the serial number of the device used as IoT Device ID.
Platform Architecture Type
The above single-touch installation command automatically reads your CPU platform arch and OS type information from the uname -m command output.
If your device is Orange Pi, Nano Pi or other Pi variations, feel free to edit the socketxp_install.sh script to meet your device or platform archtecture requirements.
The socketxp_install.sh installation script takes the following arguments:
$./socketxp_install.sh
Usage:
./socketxp_install.sh -a <auth-token> [ -p <platform> ] [ -l <local-destination> ] [ -s <subdomain-prefix> ]

Note:
Command argument auth-token is mandatory.  All other arguments are optional.
Acceptable platform values: [ amd64, arm, arm64 ]
In addition to installing and configuring SocketXP IoT Agent on your Raspberry Pi device, the single touch installation command would also make the SocketXP IoT Agent to run as a Linux Systemd deamon in the background. So that whenever your device gets rebooted, SocketXP IoT Agent will be automatically kickstarted on boot up.
How to setup both webservice(HTTP) and SSH remote access:
Now that you have setup remote access (public web URL) for your webservice, you may also want to setup remote SSH access to your IoT device.
The single-touch installation script above creates a config file at: /etc/socketxp/config.json. It would look something like this:
$ cat /etc/socketxp/config.json

{
  "tunnels" : [
    {
      "destination": "http://localhost:3000",
      "subdomain": "techron-abc123456789"
  }
]
}
tunnels section in the above config file to include the SSH service as well. The config.json file should look something like this:
$ cat /etc/socketxp/config.json

{
"tunnels" : [
  {
      "destination": "http://localhost:3000",
      "subdomain": "techron-abc123456789"
  },
  {
      "destination": "tcp://127.0.0.1:22"
  }
]
}
If you have few more HTTP services running in your device, and you would like to generate public web URL for each of those services too, then repeat the same steps explained above. Add a new service configuration in the tunnels section in the config.json file. And don't forget to restart the socketxp systemd service for the new configuration to take effect.
Security Best Practices:
Here are some security best practices that we strongly recommend you should follow when exposing your private web service via SocketXP Public Web URLs.
-
SocketXP Public Web URLs could potentially be accessed by anyone who knows about your random public URL. However, to prevent any unwanted online users from accessing your webservice, SocketXP has got a cool security feature called IP Whitelisting.
Create an IP Whitelist for your organization in the SocketXP portal Page. Add the public IP addresses or the public IP prefixes of the networks from which you would access your webservice. This way only those who access your web service from these IP addresses will be permitted to access your private webservice.
-
It is highly advisable that you add only static public IP addresses from which you want to remote access your IoT device's web service. Usually corporates have static public IP addreses assigned to their gateways/firewall instances. Use these static public IP addresses for IP Whitelisting.
How to know your public IP address? Ask your IT admins and they'll be the right people to know the list of your corporate public IP addresses. Alternatively, you could ask Google "what's my IP" and it will show your current public IP address. Add this IP to your IP Whitelist before you plan to access your web service remotely from any location from your office intranet. However, if your corporate internet gateway has many public IP addresses, they may load-balance the outbound traffic to internet via many different public IP addresses. So you may need to repeat the "google and update IP Whitelist" exercise quite a few times, initially.
In case you don't have a static public IP address, and you want to remote access your web service temporarily from a coffee shop or from your home wifi network, again ask Google to display your current ephemeral public IP address assigned to the wifi device. Add this to the IP Whitelist temporarily. Make sure you delete this ephemeral public IP address from the whitelist after you are done with your remote access. If not, anyone from the coffee shop or home network could access your web serivce via the SocketXP Public Web URL.
Security Note
When your IP Whitelist is empty, SocketXP by default will permit all accesses to your webservice from the internet(and not deny all accesses to it). Just to be explicit and clear. So when you delete the last IP address from your IP whitelist, don't falsely assume that SocketXP will now deny all accesses to your web service. Instead, SocketXP will permit all accesses, originating from any internet public IP address, to your webservice. This is the default behavior of SocketXP IP Whitelist feature.
-
We highly recommend that your web service implementation has a HTTP
login/passwordorbearer tokenbased authentication implemented using the HTTP authentication header to securely access your web service. This ability adds an additional layer of security when exposing your web service via SocketXP Public Web URL.
Option #2: Remote Access Web App using SocketXP Agent in Slave Mode
- Alternatively, you can create a TCP (SSL/TLS) tunnel using the
socketxp connect tcp://127.0.0.1:3000command, instead of creating anhttptunnel. Access the TCP service by running SocketXP agent in IoT slave mode in your laptop and use a browser to access the local endpoint. The web app will not be exposed to the public internet in this method. You'll need an auth token to securely access your web app in this method.