Firmware OTA Update
This tutorial walks you through remotely updating firmware (A/B update) on a fleet of IoT or embedded Linux devices, using the SocketXP OTA update feature end-to-end.
Before you start, make sure you have downloaded and installed the SocketXP agent on your IoT devices and completed the Getting Started guide.
Workflow Script - update.sh
The OTA update workflow script contains all the instructions required to update the firmware installed on the IoT devices.
The workflow script is designed to provide a robust, automated mechanism for updating the root filesystem of an embedded Linux device that uses U-Boot as its bootloader. It implements an A/B partitioning scheme, allowing for safe updates and reliable rollback on failure.
Warning
This workflow script is just a blueprint provided for guidance. You should modify it to suit your hardware and bootloader requirements — it may not work as-is on many hardware platforms.
The firmware update script used in this tutorial is available in our official GitHub repository.
#!/bin/bash

#================================================
# Firmware Update Workflow Script
#================================================

# The script implements A/B system update with U-Boot bootloader.
# U-Boot's "bootcmd" should refer to the "bootpart" variable to decide
# which boot partition to boot from.
# Performs healthcheck and rollback on failure.

# Configuration
NEW_ROOTFS_IMAGE="$1"
ROOTFS_A="/dev/mmcblk0p2"
ROOTFS_B="/dev/mmcblk0p3"
TEMP_IMAGE="/tmp/new_rootfs.img"
MOUNT_POINT="/mnt/new_rootfs"
HEALTH_CHECK_SCRIPT="/etc/init.d/health_check.sh"
UBOOT_BOOT_PART_VAR="bootpart"
UBOOT_BOOT_COUNT_VAR="bootcount"
UBOOT_BOOT_LIMIT="3"
UBOOT_PART_A_VALUE="1"
UBOOT_PART_B_VALUE="2"

# Function to get current boot partition
get_current_boot_part() {
  local bootpart=$(fw_printenv "$UBOOT_BOOT_PART_VAR" | awk -F '=' '{print $2}')
  echo "$bootpart"
}

# Function to set boot partition
set_boot_part() {
  local part_value="$1"
  fw_setenv "$UBOOT_BOOT_PART_VAR" "$part_value"
}

# Function to reset boot count
reset_boot_count() {
  fw_setenv "$UBOOT_BOOT_COUNT_VAR" "0"
}

# Function to switch boot partition
switch_boot_part() {
  local current_part=$(get_current_boot_part)
  if [ "$current_part" == "$UBOOT_PART_A_VALUE" ]; then
    set_boot_part "$UBOOT_PART_B_VALUE"
  else
    set_boot_part "$UBOOT_PART_A_VALUE"
  fi
  reset_boot_count
}

# Main update process
echo "$(date) - Starting OTA update..."

# Download the new rootfs image
echo "$(date) - Downloading image from $NEW_ROOTFS_IMAGE..."
curl -s -o "$TEMP_IMAGE" "$NEW_ROOTFS_IMAGE"
if [ $? -ne 0 ]; then
  echo "$(date) - Error downloading image."
  rm "$TEMP_IMAGE"
  exit 1
fi

# Download the checksum file
echo "$(date) - Downloading checksum file..."
curl -s -o "$CHECKSUM_FILE" "${NEW_ROOTFS_IMAGE}.sha256"
if [ $? -ne 0 ]; then
  echo "$(date) - Error downloading checksum file."
  rm "$TEMP_IMAGE"
  rm "$CHECKSUM_FILE"
  exit 1
fi

# Verify checksum
echo "$(date) - Verifying checksum..."
if ! sha256sum -c "$CHECKSUM_FILE" 2>/dev/null | grep -q "OK"; then
  echo "$(date) - Checksum verification failed."
  rm "$TEMP_IMAGE"
  rm "$CHECKSUM_FILE"
  exit 1
fi

# Determine the target partition
current_part=$(get_current_boot_part)
if [ "$current_part" == "$UBOOT_PART_A_VALUE" ]; then
  TARGET_ROOTFS="$ROOTFS_B"
else
  TARGET_ROOTFS="$ROOTFS_A"
fi

# Unmount target rootfs if mounted.
if mount | grep "$TARGET_ROOTFS" ; then
        umount "$TARGET_ROOTFS"
fi

# Write the new image to the target partition
echo "$(date) - Writing image to $TARGET_ROOTFS..."
dd if="$TEMP_IMAGE" of="$TARGET_ROOTFS" bs=4M status=progress
if [ $? -ne 0 ]; then
  echo "$(date) - Error writing image to $TARGET_ROOTFS."
  rm "$TEMP_IMAGE"
  rm "$CHECKSUM_FILE"
  exit 1
fi

# Clean up the downloaded image and checksum file
rm "$TEMP_IMAGE"
rm "$CHECKSUM_FILE"


# Mount the new rootfs to copy health check script
mkdir -p "$MOUNT_POINT"
mount "$TARGET_ROOTFS" "$MOUNT_POINT"
if [ $? -ne 0 ]; then
        echo "$(date) - Failed to mount $TARGET_ROOTFS"
        exit 1
fi

# Copy health check script to the new rootfs
cat <<EOF > "$MOUNT_POINT$HEALTH_CHECK_SCRIPT"
#!/bin/bash

# Configuration
UBOOT_BOOT_COUNT_VAR="bootcount"
UBOOT_BOOT_LIMIT="3"

# Function to get current boot count
get_boot_count() {
  fw_printenv "\$UBOOT_BOOT_COUNT_VAR" | awk -F '=' '{print \$2}'
}

# Function to increment boot count
increment_boot_count() {
  local current_count=\$(get_boot_count)
  local new_count=\$((\$current_count + 1))
  fw_setenv "\$UBOOT_BOOT_COUNT_VAR" "\$new_count"
}

# Function to switch boot partition (rollback)
switch_boot_part() {
  local current_part=\$(fw_printenv "bootpart" | awk -F '=' '{print \$2}')
  if [ "\$current_part" == "1" ]; then
    fw_setenv "bootpart" "2"
  else
    fw_setenv "bootpart" "1"
  fi
  fw_setenv "\$UBOOT_BOOT_COUNT_VAR" "0"
}

# Main health check logic
sleep 60
ping -c 1 google.com > /dev/null
if [ \$? -ne 0 ]; then
  echo "\$(date) - Health check failed."
  increment_boot_count

  local current_count=\$(get_boot_count)
  if [ "\$current_count" -ge "\$UBOOT_BOOT_LIMIT" ]; then
    echo "\$(date) - Boot limit reached. Triggering rollback."
    switch_boot_part
    reboot
  else
    echo "\$(date) - Boot count incremented. Rebooting."
    reboot
  fi
else
  echo "\$(date) - Health check successful. Resetting boot count."
  fw_setenv "\$UBOOT_BOOT_COUNT_VAR" "0"
  rm /etc/init.d/health_check.sh # Remove health check script
  exit 0
fi
EOF

chmod +x "$MOUNT_POINT$HEALTH_CHECK_SCRIPT"
umount "$MOUNT_POINT"
rmdir "$MOUNT_POINT"

# Switch boot to the new rootfs
switch_boot_part

# Reboot to load the new rootfs
reboot
What the script does:
-
Initializes configuration variables, including the download URL for the new root filesystem image, the target partitions for the A/B update, temporary file paths, U-Boot environment variable names, and boot count limits. It also defines functions to manipulate the U-Boot environment: getting/setting the boot partition, resetting the boot count, and switching between boot partitions.
-
Downloads the new root filesystem image and its checksum file, and verifies the image's integrity against the checksum. If verification fails, the script exits. Otherwise, it determines the target partition based on the current boot partition, unmounts it if necessary, and writes the new image to it using
dd. -
Mounts the new root filesystem to a temporary mount point and writes a health check script into it. This health check script runs after reboot and verifies basic system functionality (network connectivity). If the health check fails, it increments the boot count in U-Boot and triggers a rollback to the previous partition once the boot count exceeds the configured limit; otherwise it reboots and retries. If the health check succeeds, it resets the boot count, removes itself, and exits.
-
Finally, the main script switches the U-Boot boot partition to the newly updated partition and reboots the device.
Upload the Artifact
We'll upload the update.sh workflow script directly to the SocketXP Artifact Registry as a script type artifact.
Log in to your SocketXP account and go to the OTA Update page. In the Artifacts table, click Upload new artifact.
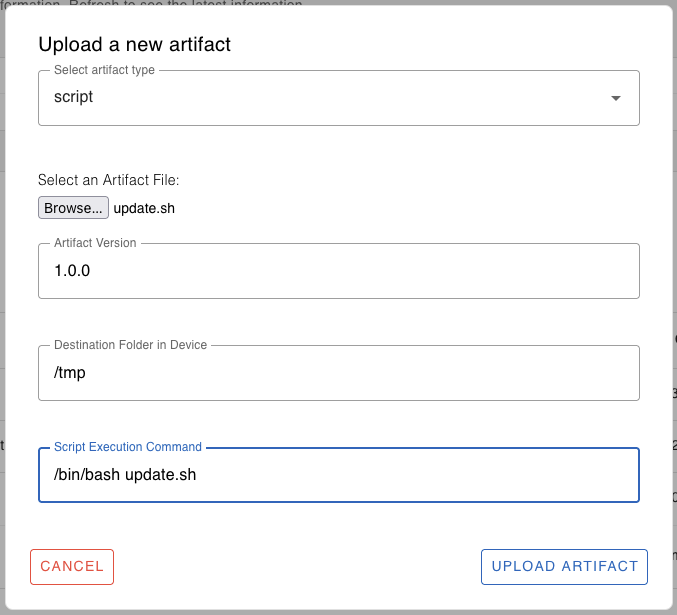
Select artifact type script. Browse and select the update.sh file. Specify the artifact version, 1.0.0 in this example.
Specify the destination folder on the target device where the script should be downloaded and executed, for example: /tmp or /home/user/myapp or /usr/bin.
Specify the command to execute the script on the target device, for example: /bin/bash update.sh.
Click Upload to upload the artifact to the cloud registry. You'll see a message saying "File uploaded successfully".
Deploy the Artifact
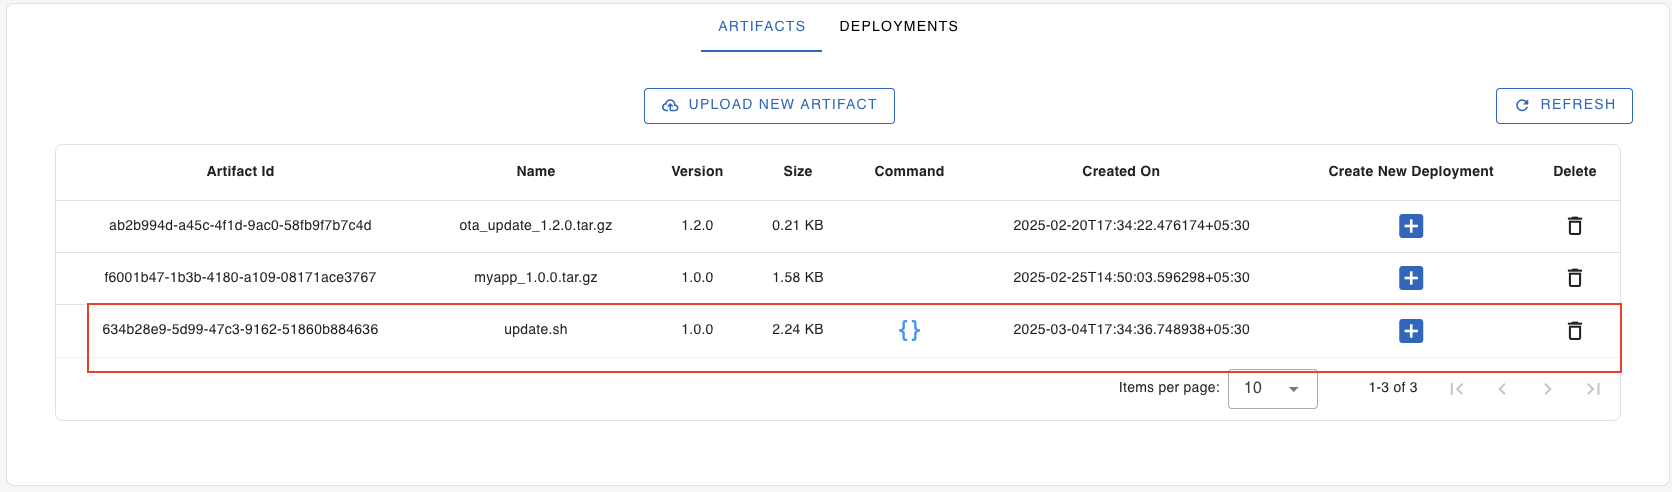
From the Artifacts table, select the artifact you just uploaded.
Note
If you don't see your artifact yet, click Refresh to reload the table data.
Click the + icon next to the artifact to create a new deployment.
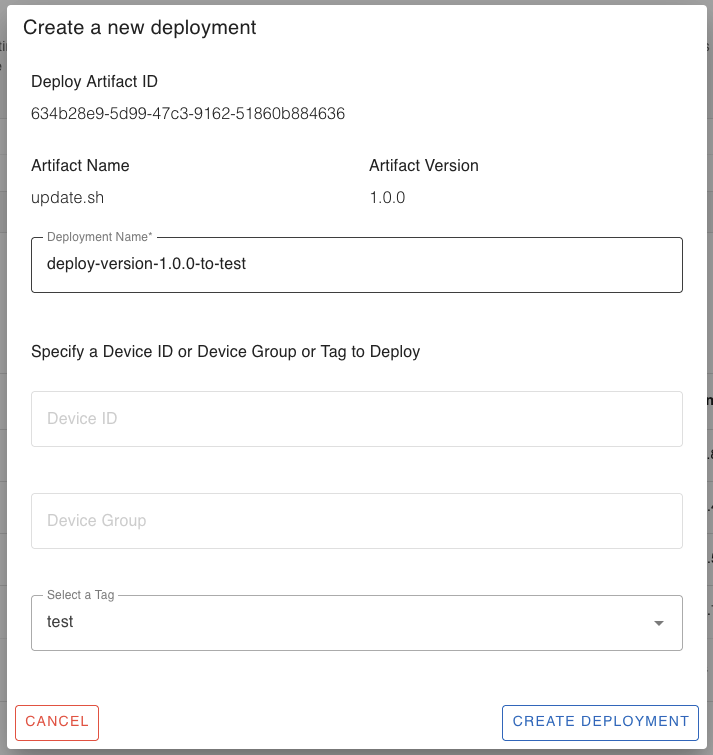
Give the deployment a name, for example, deploy-version-1.0.0-to-test-devices. Specify the target device ID, device group, or tag to deploy the artifact on.
Note
You can deploy the artifact on a single device ID, device group, or device tag. To deploy on more than one group or tag, repeat the "Create New Deployment" process for each.
Click Create Deployment. Go to the Deployments tab and click Refresh.
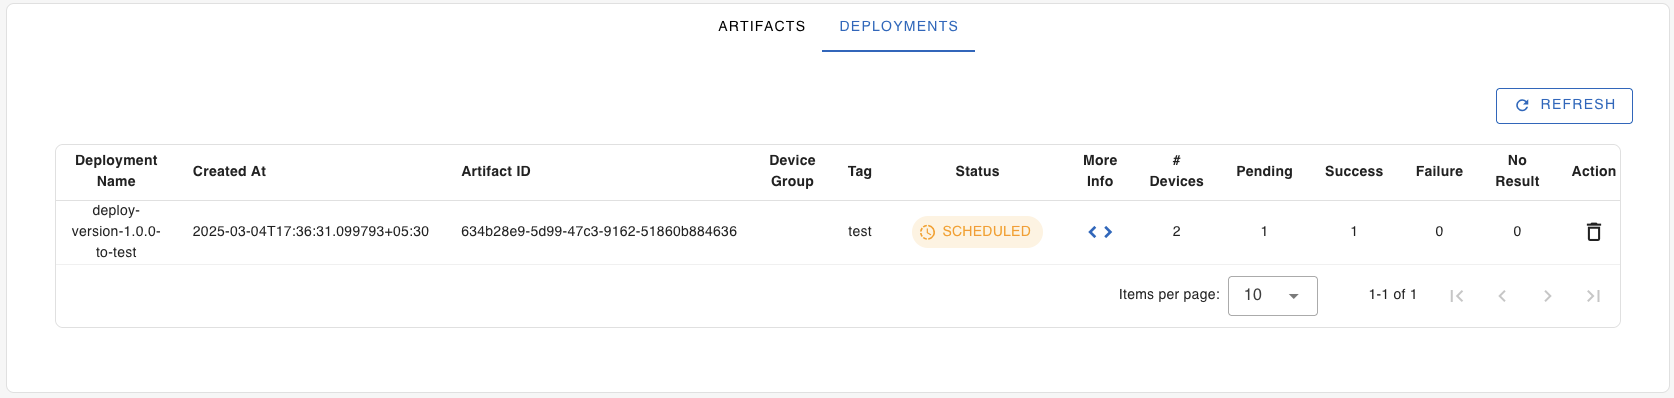
Select the deployment to see its progress. Click More Info < > to monitor the progress on each target device in the group or tag. Click Refresh to view the progress.
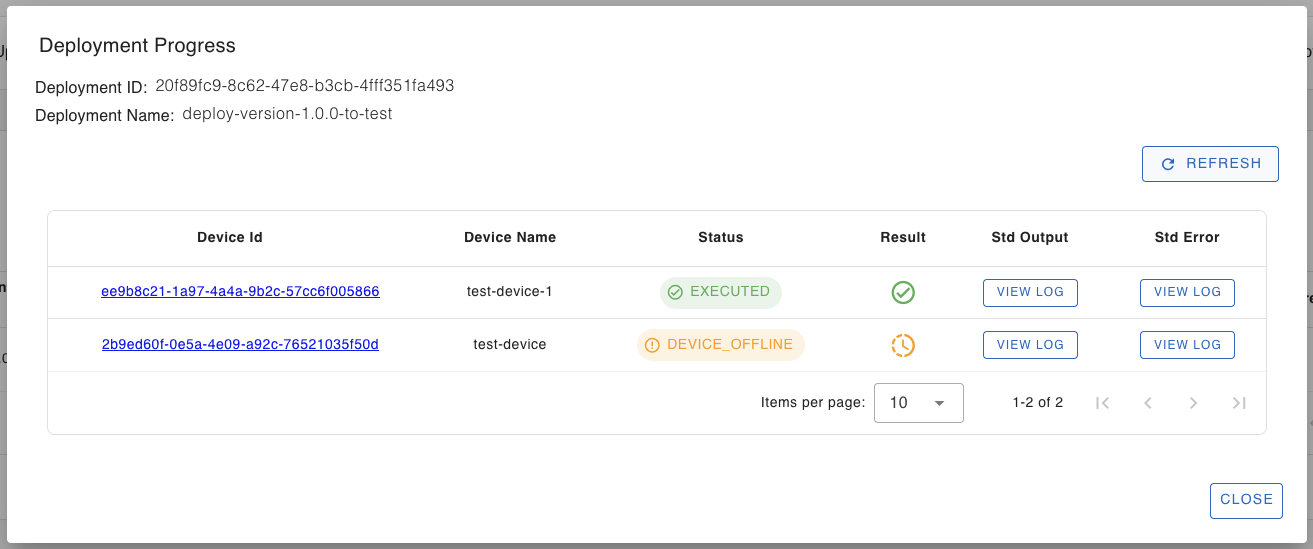
You can check the stdout and stderr logs generated by the update process by clicking the view log buttons.
Log in to one of the devices to verify that the firmware update was successful.
You have successfully updated the firmware on remote IoT or embedded Linux devices using SocketXP OTA update.
Next Steps
Now that you've learned how to deploy firmware OTA updates, check out the other artifact types: